
This page covers the practical elements of the Advanced Web Technology course run by Macquarie University Computing Department.
Tclhttpd is a full featured web server that's very simple to use and needs no installation or configuration. Simply copy the tclhttpd.exe file and the htdocs folder from the CDROM to your hard drive. tclhttpd.exe is the web server application, htdocs is where it will look for web pages to serve. htdocs must be in the same directory as tclhttpd.exe:
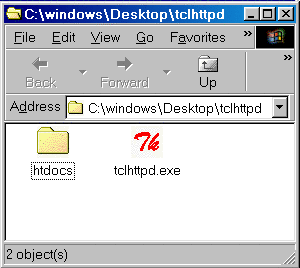
One easy way to achieve this is to copy the software folder from the CDROM onto your hard disk (rename it if you wish). Alternatively you could unpack this zip file (web-server.zip) on your machine.
Simply double click the tclhttpd application to run the web server. This should display a server status window. Once this is running you should be able to access pages on your server via the address: http://127.0.0.1:8015/ -- the server runs on port 8015 and 127.0.0.1 is a special internet address for your own machine (localhost might also work here, ie http://localhost:8015/).
A TCL editor called ASED is included on the CDROM which you might find useful. It provides some particularly useful facilities for writing TCL including being able to run code from within the editor and highlighting your code in different colours. To run it, double click the ased icon from the CDROM or copy it to your hard disk. You can use ASED for editing HTML files and Tcl code if you wish. Some documentation for ASED is included here. If you don't want to use ASED, you can use any other text editor including Notepad if you wish.
The htdocs folder already has the example form web page (which we'll look at later) and a few HTML pages which are used by the server when there's an error (error.html and notfound.html). index.html is the default page served when no page name is given in the URL. Since there is no index.html file in your htdocs folder you will see a directory listing instead.
Create an index.html file in the htdocs folder. Something like the following:
 <html>
   <head>
     <title>My Site</title>
   </head>
   <body>
     <h1>My Site</h1>

     <p>This is my web site. </p>

   </body>
 </html>
Now retry accessing the root of your web server (http://127.0.0.1:8015/), you should now see your index page instead of the directory listing.
Next, create a new web page in the htdocs folder, aboutme.html, add some HTML text like the following:
 <html>
   <head>
     <title>About Me</title>
   </head>
   <body>
     <h1>About Me</h1>

     <p>This page is just about Me. </p>

     <p>I'm busy just now but will add more later.</a>

     <p>Meanwhile go <a href="/index.html">to the home page</a></p>

   </body>
 </html>
Now add a link to aboutme.html into your index.html file:
<p>Go to <a href="aboutme.html">About Me</a></p>
Add some more pages, the main purpose here is just to have a few pages that you can organise into a web site.
The server will interpret any file with a .shtml extension as a file containing server side include instructions and will process these before serving the file. We'll use this facility to add a standard navigation bar and page footer to your web site.
First rename each of your html files to .shtml and modify the links in your files to point to .shtml files.
Create a file containing a navigation bar. This file will contain a simple list of links to the other pages in your site. For example:
 <p align="center">
  <a href="/index.shtml">Home</a>
  <a href="/aboutme.shtml">About Me</a>
  <a href="/info.shtml">Information</a>
 </p>
Then create a file containing a footer, for example:
<hr>
<p align="right">Copyright © 2002, Steve Cassidy</p>
Now include these files into each file in your website. Near the top after <body>:
<!--#include virtual="nav.html"-->
and at the end of the file, before </body>:
<!--#include virtual="footer.html"-->
You should now be able to browse your site and see the standard navigation bar and footer on your site.
The example form shown in class is included in the file form.html in your htdocs folder and the corresponding action script is in cgi-bin folder as test.cgi. Try filling in the form and submitting it and observe the results: you should see your name and age echoed in the returned page.
Modify the form to include a set of radio buttons to select between three flavours of icecream: Chocolate, Strawberry or Vanilla; use the variable flavour.
The script env.cgi in your cgi-bin folder will simply print out all of the data sent to it by the server (the environment). You should be able to access it via the URL http://127.0.0.1:8015/cgi-bin/env.cgi . Look at the information that is passed. Now add a query string to the end of the URL (eg. http://127.0.0.1:8015/cgi-bin/env.cgi?name=steve) and look in particular at the QUERY_STRING variable. This is how the query data is passed to your TCL script in a GET request. Note that you don't need to know the format since the ncgi package deals with it (and will also deal with the POST method which uses a different mechanism).
Write a new web form using more of the range of form input types. Your form will be used to enter personal details for a user of your website. It should include the following information:
Use the tutorial information in the HTML tutorial at w3schools to assist with this task.
If you want to begin to learn more about the Tcl language you can use the TclTutor application supplied on the CDROM (in the software folder). This application is a computer based learning course for Tcl which steps through all of the major points in the langauge. You probably don't want to go through it today (during the course) but you might want to look at the first few lessons.
Any script that you put into the htdocs/cgi-bin folder with a .cgi or .tcl extension will be executed by the server as a CGI script. The server on the CDROM is set up only to execute Tcl scripts although it can be configured to run scripts in any language (eg. Visual Basic or Perl). So, to create a CGI script just make a new file in this folder (using ASED or Notepad) and put your Tcl code in there. I'd recommend that you use test.cgi as a starting point for your own scripts.
We'll begin by modifying the test.cgi script which responded to the form you wrote eariler. Firstly modify the script to also include in the output page the value of the interests variable from the input form.
Next, modify the script to write out the value of flavour variable submitted by your modified form. Then add an if statement so that if the user selected Vanilla, you also print out a message saying "That's my favourite too!".
Write a new CGI script which generates a web page listing the numbers from 1 to 20, their square roots and their squares. You can calculate these values with the following Tcl code:
  set square [expr $number^2]
  set root   [expr sqrt($number)]
Use a for loop to generate these values and put each inside a paragraph.
As an extension, put each value into the rows of a table, that is, generate:
    <table>
      <thead>
	<tr>
	  <th>Number</th>
	  <th>Square</th>
	  <th>Root</th>
	</tr>
      </thead>
      <tbody>
	<tr>
	  <td>1</td>
	  <td>1</td>
	  <td>1</td>
	</tr>
	...etc...
      </tbody>
    </table>
Modify this script to take input from a form via CGI. Write a web page with a form containing inputs for the lower and upper bounds of the table. The CGI script should check that the values input are numbers and then calculate the table as before using the submitted upper and lower bounds. You can check that values are numbers with the following Tcl code:
 if {![string is digit [ncgi::value lower]]} {
  ...code to report that lower is not a number...
 } elseif {![string is digit [ncgi::value upper]]} {
  ...code to report that upper is not a number...
 } else {
  ...code to run when all is well...
 }
If non-numbers are submitted, the script should report an error, instructing the user to click the 'back' button and re-submit the form.
To finalise this practical session we'll look at a simple web application which acts as a message board. The application consists of three CGI scripts which display messages, allow users to submit new messages, and save messages on the server. This is quite a simple web application but can be used as the basis of some more interesting extensions.
First write the CGI script which generates the form for submitting new messages: post.cgi. This could be a static HTML page but it's useful to generate it via a script to have a uniformity throughout the web application. The Tcl html package also includes some useful shortcut procedures for generating form elements.
Your form should include only a textarea for input of the message text and a submit button. Here's the Tcl code to generate this form:
 ## generate a form for user to enter a message
 puts [html::openTag form action="savemsg.cgi"]
 puts "<p>Enter Message Text:</p>"
 puts "<p>[html::textarea message {cols=50 rows=10} ]</p>"
 puts "<p>[html::submit Submit]</p>"
 puts [html::closeTag]
Next write the CGI script that is the action of this form: savemsg.cgi. This script will accept the message from the form and store it on the server. To simplify our design we'll store each message in a file in the data sub-folder within cgi-bin. The name of each file will be the value returned by [clock seconds] which is the current time in seconds -- this should be enough to make the names unique.
First, create the data folder inside cgi-bin.
Next, write the CGI script to accept the message text from the form via CGI, open a file to store the message in, write the message to the file and close the file. Here's code to do that:
    ## The name of the file will be the current time in
    ## seconds + .txt in the data directory
    set filename [file join data "[clock seconds].txt"]

    set handle [open $filename w]
    puts $handle [ncgi::value message]
    close $handle
After the message has been stored, generate a brief information page for the user saying that all went well and giving a link to the view message page.
As an extension, check that the message text isn't empty and if it is don't create a file and return an error message.
The final page to write is the one which displays messages: viewmsg.cgi. This will be the main page for the application and should have a link to the post.cgi script and a list of the current messages posted.
To find the current list of messages we just need to find the names of files in the data directory, each of these will correspond to a message. To do this we can use the glob procedure:
set messages [glob -nocomplain -directory data *.txt]
This will find all files in the data directory matching the pattern *.txt and won't complain if it doesn't find any.
Once we have the messages, they can be rendered in the page in any way you choose. You might like to put them in an ordered list or in the rows of a table or just in paragraphs. To get the text of a message, open the file, read the contents and then close the file. To process all of the messages use a foreach loop:
 foreach file $messages {
    set handle [open $file r]
    set message [read $handle]
    close $handle
    puts "<p>$message</p>"
 }
That's it! You now have a working web application, you should be able to post messages and see them on the viewmsg.cgi page.
Allow the author name to be stored with the message. This requires you to extend the post.cgi form and to find a way to store both the author name and the message text for a message. The notes descripe one method of storing the data as a TCL list:
 set msgdata [list [ncgi::value name] [ncgi::value message]]
 set handle [open $file w]
 puts $handle $msgdata
 close $handle

 # ...and to read it...

 set handle [open $file r]
 set msgdata [read $handle]
 close $handle
 set name [lindex $msgdata 0]
 set message [lindex $msgdata 1]
Using this technique you could add other bits of information to the form such as an Email address or web URL. If you include an either of these, why not turn them into hyperlinks on the final page (eg. <a href="mailto:$email">... or <a href="$url">...).
A good program should always check for errors during execution. In addition to checking for empty messages, you should also check that opening the file for writing succeeds. If the open fails, TCL will raise an exception (error) which would normally cause the program to crash. We can prevent this by catching the exception using catch. catch runs a bit of TCL code and returns zero if there were no errors and some non-zero value if it does. You can also give catch a variable name which will contain any error messages if there were problems or just the result of running the code if there weren't. The safe way to open a file in Tcl is then:
 if {[catch {open $file w} handle]} {
   puts "<p>Can't open file, error message: $handle</p>"
 } else {
   ... all was well...$handle is our file handle
 }
Rewrite your CGI scripts to use this safe form of file handling.
Combine the posting form with the listing of messages so that a user can submit a new message straight from the main page.
Combine the savemsg.cgi page with the main page so that all of the functionality is in one CGI script. First change the action of the form you generate to point to the viewmsg.cgi script.
You will now need to test whether there is CGI input (the message) from the form in order to decide whether to save a new message. Do this before you generate the main message list page so that the new message will appear in the listing. So, the general structure of the script would be:
 if {[ncgi::value message] != ""} {
   ## save the message as per savemsg.cgi
 }

 ## generate the form as per post.cgi

 ## generate the message list as before
This is a common structure for web applications. One CGI script can generate many pages depending on the input values.
Limit the number of messages shown to the ten most recent, show them in order of recency (newest messages at the top). You can do this using the lsort and lrangefunctions:
set messages [lindex [lsort -decreasing $messages] 0 10]
lindex will return all of the list if there are less than 10 messages.
Add a refresh request to the generated view page. If you are using html::head to generate your page header, you can do this easily with:
 ## refresh this page every 20s
 html::refresh 20
This will add a <meta http-equiv="Refresh" content="20"> element in the page header which instructs the browser to re-fetch this page every 20 seconds.
The effect of this is that your user will see any new messages posted to the board every 20 seconds. You now have the core of a web chat room application.
Copyright © 2002, Steve Cassidy, Centre for Language Technology, Macquarie University.